The advanced operating system designed for film and television!
HyperDeck ISO Recorder 100G features the same advanced Blackmagic OS software as used on Blackmagic Design's digital film cameras, so you get an advanced operating system that’s designed for the tough technical requirements of the film and television industry. All settings can be accessed with a single tap on the front panel menu button, so you can adjust all settings for recording, monitoring, audio, setup and more. All HyperDeck features run as a self contained app running on top of Blackmagic OS, so all functions feel smooth without feeling stalled or delayed, plus you get exceptional overall stability. Best of all, Blackmagic OS is upgradable so you can get more features in the future!
Buy NowStatus Feedback
HyperDeck ISO Recorder 100G includes a status LCD that shows you live video and audio meters, as well as including a range of status information. You can instantly see the video format with frame rate, status of record, playback and jog modes, plus the status of the network storage and timecode!

Network Services
With HyperDeck ISO Recorder 100G, files are accessed direct from the network storage it records to. This means that you don’t have to deal with media cards to transfer files as the editors can just mount and edit from the network storage directly.

External Monitoring
HyperDeck ISO Recorder 100G has a monitoring output with record status. Important HyperDeck settings are shown, including codec, video standard, timecode, the deck custom name, the transport status, storage status and audio meters. Simply scroll between the ISO channels with the search dial.


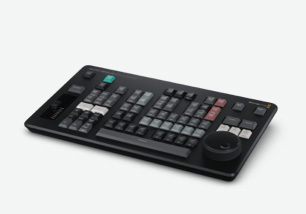
Front Panel LCD


System Menus
Record
The record menu is where the main video settings are for HyperDeck and they include input selection and ProRes quality setting. This menu also has options for triggering recording from the SDI video input status.
Monitor
The monitor menu allows setting features such as clean feed on the dedicated SDI and HDMI monitoring output. The clean feed menu will remove all overlays from the monitor output.
Audio
The audio menu has settings for the number of audio channels to record, plus the VU meter standard and the headphone and speaker volume levels. The audio meter selection can be PPM or VU. For convenience the headphone and speaker levels are separate.
Storage
The storage menu lets you see the next disk used for recording. You can even browse and select various network storage located over your Ethernet network as well as selecting the active record folder.
Setup
The setup menu lets you totally customize your HyperDeck. You can use this menu to change languages, set date and time, change between light and dark mode, update network settings, change HDR settings and more!

Record and Monitor Menus

Codec
The codec menu lets you select which ProRes quality to be used for recording.

Trigger Record
The trigger record menu allows the recording to start based on the video input. It allows HyperDeck to watch the video input. On a 2110 ancillary data start/stop flag, it can start recording, or it can record when the timecode starts counting!

Clean Feed
Some HyperDeck models have a dedicated HD monitoring output and the clean feed setting ensures all overlays are removed to make the output clear of all graphics. This means you can use the monitoring output as an extra down converted video output!

Audio Menu

Record Audio Channels
This menu lets you select how many audio channels to de-embed from the video input. You can select 2, 4, 8,16, 32 or 64 channels. Selecting 2 channels helps with software compatibility. The meters on the monitoring output will match the channel qty.

Monitor Channels
This menu lets you select what channels to use when monitoring audio using the headphones or speaker on the front panel. You can select any pair of 2110 audio channels, limited only by the number of channels selected for recording.

Audio Meters
This setting lets you change audio meters on the front panel LCD and on the monitoring output. This sets the meter ballistics and levels. Options are VU-20 dBFS, VU-18 dBFS, PPM-20 dBFS and PPM-18 dBFS. The default is VU-20 dBFS as defined by SMPTE.

Headphone Level
This menu sets the volume on the front panel headphone connection. You can adjust this without headphones connected. However with headphones connected, you can adjust volume by holding the speaker button while rotating the search dial.

Speaker Level
The speaker volume can be adjusted using this menu. Press and hold the speaker button to listen, or double press to lock on. Without any headphones connected, you can adjust speaker volume by holding the speaker button and rotating the search dial.

Storage Menu

Media 1
The media 1 menu lets you see which storage you will use for recording for the first location to use when recording starts.

Media 2
Media 2 is the next disk that will be used for recording after moving on from Media 1.

Network Disk
This menu item lets you record direct to network storage. Selecting the menu will show available network disks to select for recording. Select the disk and browse to the correct folder for recording.

Setup Menu

HyperDeck Name
This menu shows you the custom HyperDeck name. Custom names allow identifying multiple HyperDecks! You can set the custom name in the utility software on Mac or Windows. Examples of custom names could be Deck 1, Deck 2, or even camera numbers!

Language
The language menu lets you set the language used in the menus and on screen overlays on the monitoring output. You can change to English, Chinese, Japanese, Korean, Spanish, German, French, Russian, Italian, Portuguese, Ukrainian, Polish and Turkish.

Date
The date menu lets you set the date in the HyperDeck real time clock. It’s important to set the correct date so when you record files, the file date will be correct on the media disk.

Time
The time menu lets you set the time in the HyperDeck real time clock. The time is also used when creating files when recording. Plus the real time clock is used to calculate time of day timecode in the timecode generator.

HyperDeck Software
The software menu lets you know the HyperDeck software version. You can update the software using a computer connected via USB or Ethernet. We often release updated software with new features, so this menu lets you know you are up to date!

Front Panel Display
The appearance menu lets you set the LCD to light or dark mode. Light mode will use a light background with dark lettering, while dark mode will use a dark background with white lettering. Dark mode is great when working in dark control rooms!

Camera Number
The camera number allows you to select a camera number for the metadata camera# tag in the recorded files. Entered as a letter, this allows software to detect between cameras, such as when using the Sync Bin in DaVinci Resolve for multi-cam editing.

Network Protocol
The network protocol menu is how the HyperDeck will connect to the Ethernet network. You can choose DHCP where the HyperDeck will get assigned an IP address automatically, or static IP where you can set the network address manually.

Network IP Address
The IP address will be set automatically if you are using DHCP in the network protocol menu. If you are using DHCP, this is the assigned IP address, however if you have static IP, this menu is where you enter the address manually.

Network Subnet Mask
The subnet mask setting is a technical setting and lets your network administrator create a logical subdivision of your IP network. You don't need to change this setting if you are using DHCP, or you can enter in a value if using a static IP.

Network Gateway
The gateway is the address of a computer or network router on your network that forwards data to other networks, such as the internet. This setting is assigned automatically when set to DHCP, or you can set this value manually when using static IP.

Timecode Input
The timecode input is the source used when recording video. The video input setting can use 2110 PTP timecode sources. Or you can use the end of the last recorded clip, or a specific preset value.

Timecode Preference
The timecode preference lets you use either drop frame or non-drop frame timecode. When set to drop frame, the LCD timecode will change to use semicolons. Drop frame timecode is used for correct time of day timecode when using 59.94 fps standards.

Timecode Preset
This menu lets you manually enter the timecode to use for recording. This means you can preset the timecode generator to a specific time before recording starts. Most broadcasters start recordings at 1 hour timecode, but you can use any time!

Timecode Output
The timecode output menu will change how the HyperDeck embeds timecode into the 2110 ancillary data. Normally you get a constant timecode out for the whole playback, however changing this menu lets you use the timecode in each playback clip.

Timestamp File Suffix
This lets you enable an additional timestamp to be added to the end of the recorded file name. This setting is off by default. If you would like the date and time added to your file name, simply turn this setting on.

HDR Playback
This setting allows you to automatically detect and output HDR information onto the SDI output from the playback file tags. Or if there is a problem with the files tags, you can override the HDR setting with this menu.

HDR Record
If the HDR flags in the input video are not correct, then you can override the bad HDR information for recording. Normally the video input HDR flags are used in the auto setting, but you can also manually override the HDR flags for the recorded file.

Remote
This menu sets the remote on and off. When off, deck control from Ethernet and RS-422 will be blocked. The advanced models also have a button for this setting on the front panel! When off, you can still read deck status, as only control is blocked.

Factory Reset
The factory reset button is used to return all the HyperDeck settings back to their default values. This is great when someone has changed settings and you want to return all the features back to a known state for your next job.